Android
Kotlin
读书笔记
"《第一行代码:Android 3rd》第九章和第十章的读书笔记,主要内容包括四大组件中的Service以及一些手机多媒体的使用。"
为方便笔记,约定使用伪Kotlin语法 :
<!ClassName> 用来表示ClassName类的一个实例
<Abstract>或<A> 写在方法(类)前用来表示该方法(类)是一个必须要给出实现的抽象方法/类
<Static>或<S>写在方法(类)前用来表示该方法(类)是一个静态的方法/类
<+> 表示public方法
O 是override的缩略
XXX 表示待定的语法字符串
... 表示前后代码段省略
UML 图 的规定:
斜体函数*为抽象函数
下划线函数$为静态函数
以下前缀代表访问权限
+ Public- Private# Protected~ Package/Internal
classDiagram
class NotificationManager {
+notify()
+createNotificationChannel()
}
class NotificationChannel
class NotificationCompat {
+Builder()
}
NotificationCompat --> Notification: 创建
NotificationManager --> NotificationChannel: 创建、管理
NotificationManager --> Notification: 发送
Notification --* NotificationChannel: 对应
创建:val manager = getSystemService(Context.NOTIFICATION_SERVICE) as NotifictionManager
备注:getSystemService() 是 Context 的一个用来获取系统服务方法。
每条通知都要属于一个对应的渠道。每个应用程序都可以自由地创建当前应用拥有哪些通知渠道,但是这些通知渠道的控制权是掌握在用户手上的。用户可以自由地选择这些通知渠道的重要程度,是否响铃、是否振动或者是否要关闭这个渠道的通知。
创建通知渠道 1 2 3 4 5 6 7 8 if (Build.VERSION.SDK_INT >= Build.VERSION_CODES.O) { val channel = NotificationChannel(channelId: String, channelName: String, importance)
通知渠道重要等级:IMPORTANCE_HIGH、IMPORTANCE_DEFAULT、IMPORTANCE_LOW、IMPORTANCE_MIN,用不同level构造的channel会有不同的表现,如HIGH级别的渠道会弹出通知。
可以在 Activity(较少)、Broadcast、Service 中创建
通知の构建与发送 1 2 3 4 5 6 7 8 9 10 11 12 13 14 val notification = NotificationCompat.Builder(context, channelId: String)true )Int , notification: Notification)
通知属性(进阶):.setStyle() 方法——让通知呈现富文本
flowchart TD
Style --> BigPictureStyle;
Style --> BigTextStyle
setStyle 举例 1 2 3 4 5
为通知设置点击事件:.setContentIntent(pi: PendingIntent)
构建PendingIntent 1 2 3 <S> PendingIntent.getXXX(ctx: Context, 0 , intent: Intent, flag: Int ): PendingIntent
flowchart TB
A[fa:fa-camera-retro intent机制呼出相机拍照]
获取对应的Uri对象 --> 给intent传入Uri指定相片将写入的文件
A --> 将拍摄的照片显示出来
创建对应路径的File对象 --> 获取对应的Uri对象
给intent传入Uri指定相片将写入的文件 --> A
相机实例 1 2 3 4 5 6 7 8 9 10 11 12 13 14 15 16 17 18 19 20 21 22 23 24 25 26 27 28 29 30 31 32 33 34 35 36 37 38 39 40 41 class MainActivity : AppCompatActivity lateinit var imageUri: Urilateinit var outputImage: Fileoverride fun onCreate (savedInstanceState: Bundle ?) super .onCreate(savedInstanceState)"output_image.jpg" )if (outputImage.exists()) {if (Build.VERSION.SDK_INT >= Build.VERSION_CODES.N) {this , "com.example.cameraalbumtest.fileprovider" , outputImage)else {val intent = Intent("android.media.action.IMAGE_CAPTURE" )override fun onActivityResult (requestCode: Int , resultCode: Int , data : Intent ?) super .onActivityResult(requestCode, resultCode, data )when (requestCode) {if (resultCode == Activity.RESULT_OK) {val bitmap = BitmapFactory.decodeStream(contentResolver.openInputStream(imageUri))
代码中用到"com.example.cameraalbumtest.fileprovider",需要在Manifest中注册。
fileprovider注册示例 1 2 3 4 5 6 7 8 9 <provider android:name ="androidx.core.content.FileProvider" //固定不变 android:authorities ="com.example.cameraalbumtest.fileprovider" //与FileProvider.getUriForFile ()第二个参数一致 android:exported ="false" //是否允许外部使用 android:grantUriPermissions ="true" > <meta-data //指定Uri 共享路径 android:name ="android.support.FILE_PROVIDER_PATHS" android:resource ="@xml/file_paths" /> </provider >
res/xml/file_paths.xml文件示例 1 2 3 4 5 <?xml version="1.0" encoding="utf-8"?> <paths xmlns:android ="http://schemas.android.com/apk/res/android" > <external-path name ="my_images" path ="/" /> </paths >
flowchart LR
发送请求Intent-->接受并处理结果Result
相簿示例 1 2 3 4 5 6 7 8 9 10 11 12 13 14 15 16 17 18 19 20 21 22 23 24 25 class MainActivity : AppCompatActivity override fun onCreate (savedInstanceState: Bundle ?) val intent = Intent(Intent.ACTION_OPEN_DOCUMENT)"image/*" override fun onActivityResult (requestCode: Int , resultCode: Int , data : Intent ?) super .onActivityResult(requestCode, resultCode, data )when (requestCode) {if (resultCode == Activity.RESULT_OK && data != null ) {data .data ?.let { uri ->val bitmap = getBitmapFromUri(uri)
classDiagram
class Activity {
getAssets();
}
class AssetManager {
+openFd();
}
class MediaPlayer {
+setDataSource();
+prepare();
}
Activity-->AssetManager: 创建
AssetManager-->MediaPlayer: 提供播放资源
MediaPlayer 可以用于播放网络、本地、app安装包中的音频
方法名 功能描述
setDataSource()
设置要播放的音频文件的位置
prepare()
在开始播放之前调用,以完成准备工作
start()
开始或继续播放音频
pause()
暂停播放音频
reset()
将MediaPlayer对象重置到刚刚创建的状态
seekTo()
从指定的位置开始播放音频
stop()
停止播放音频。调用后的MediaPlayer对象无法再播放音频
release()
释放与MediaPlayer对象相关的资源
isPlaying()
判断当前MediaPlayer是否正在播放音频
getDuration()
获取载入的音频文件的时长
app/src/main/assets 内的文件和子目录在项目打包时会一并打包到安装文件中。
AssetManager 就是用来管理asset内文件的工具类
播放安装包内音频 1 2 3 4 5 6 7 8 9 10 11 12 13 14 15 16 17 18 19 20 21 22 23 24 25 26 27 28 29 30 31 32 33 34 35 36 37 38 39 40 class MainActivity : AppCompatActivity private val mediaPlayer = MediaPlayer()override fun onCreate (savedInstanceState: Bundle ?) super .onCreate(savedInstanceState)if (!mediaPlayer.isPlaying) {if (mediaPlayer.isPlaying) {if (mediaPlayer.isPlaying) {private fun initMediaPlayer () val assetManager = assetsval fd = assetManager.openFd("music.mp3" )override fun onDestroy () super .onDestroy()
VideoView 类实际上是在MediaPlayer上的一层封装。
注意VideoView不支持播放asset文件,但可以播放app/src/main/res/raw下的文件(想到VideoView是一种View就不难理解)。
注意VideoView不适合做功能强大的视频播放器。
VideoView控件 1 2 3 4 5 <VideoView android:id ="@id+videoView" ...layout_width =... ...layout_height =... ... />
VideoView类 1 2 3 4 5 6 7 8 9 10 11 12 13 14 15 16 17 18 19 20 21 22 23 24 25 26 27 28 29 30 31 32 33 val uri = Uri.parse("android.resource://$packageName /${R.raw.video} " )override fun onDestroy () super .onDestroy()suspend ()
kotlin创建线程的三种方式 1 2 3 4 5 6 7 8 9 10 11 12 13 14 15 16 17 18 class MyThread : Thread override fun run () object : Runnable { override fun run ()
Android 只能在主线程中改UI,因此在子线程中想要进行UI操作就需要异步机制
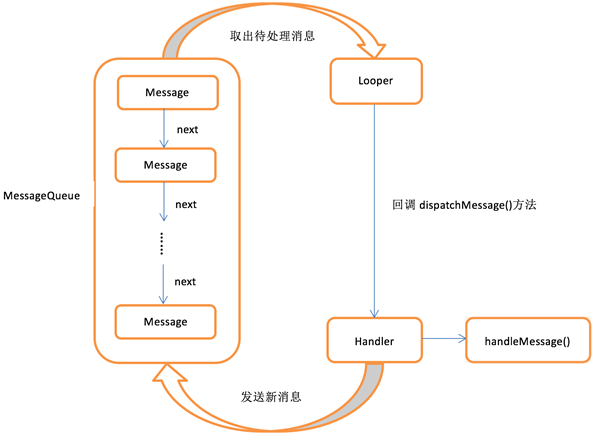
Message是在线程之间传递的消息,它可以在内部携带少量的信息,用于在不同线程之间传递数据。
Handler主要用于发送和处理消息,发送消息一般是使用Handler的sendMessage()方法、post()方法等,而发出的消息经过一系列地辗转处理后,最终会传递到Handler的handleMessage()方法中。
MessageQueue是消息队列的意思,它主要用于存放所有通过Handler发送的消息。这部分消息会一直存在于消息队列中,等待被处理。每个线程中只会有一个MessageQueue对象。
Looper是每个线程中的MessageQueue的管家,调用Looper的loop()方法后,就会进入一个无限循环当中,然后每当发现MessageQueue中存在一条消息时,就会将它取出,并传递到Handler的handleMessage()方法中。每个线程中只会有一个Looper对象。
异步消息处理机制实例 1 2 3 4 5 6 7 8 9 10 11 12 13 14 15 16 17 18 19 20 21 22 23 24 25 26 27 class MainActivity : AppCompatActivity val updateText = 1 val handler = object : Handler() {override fun handleMessage (msg: Message ) when (msg.what) {"Nice to meet you" override fun onCreate (savedInstanceState: Bundle ?) super .onCreate(savedInstanceState)val msg = Message()
classDiagram
class Message {
Int what
Int arg1
Int arg2
Object obj
}
class Handler {
+sendMessage(Message m)
+post()
+handleMessage(Message m)*
}
Handler --> Message: 发送
Message --> Handler: 处理
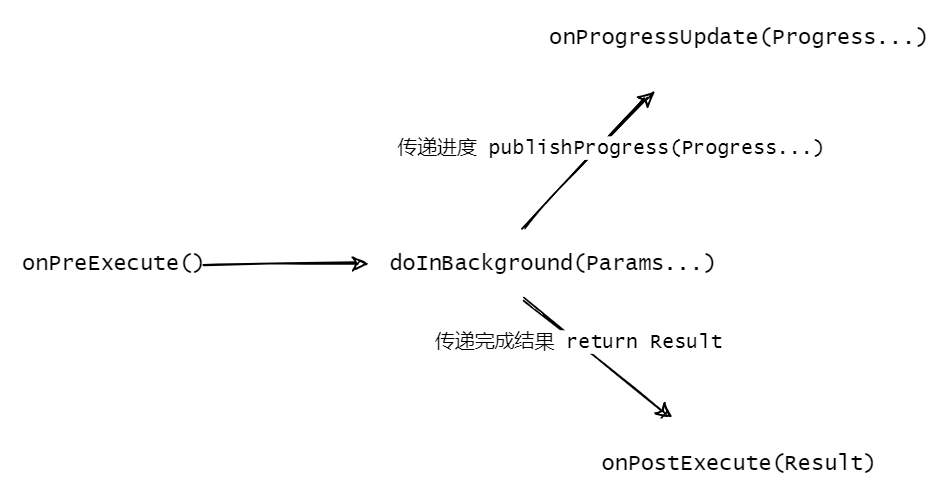
解析AsyncTask类 1 2 3 4 5 6 7 8 <A> AsyncTask<paramsType, progressType, resultType> {
Service类解析 1 2 3 4 5 6 class Service Int , startId: Int )
Activity中启动与停止Service 1 2 3 4 5 6 7 startServiceBtn.setOnClickListener {val intent = Intent(this , MyService::class .java )val intent = Intent(this , MyService::class .java )
继承一个Binder,在类中编写自己的函数,通过onBind() 返回该实例给Activity,Activity中调用该实例的方法以实现Activity与Service的通信
classDiagram
class IBinder
<<interface>> IBinder
class MyBinder {
<<自定义>>
}
IBinder <|-- Binder
Binder <|-- MyBinder
classDiagram
class ServiceConnection {
onServiceConnected(ComponentName name, IBinder service)
onServiceDisconnected(ComponentName name)
}
绑定示例 1 2 3 4 5 6 7 8 9 10 11 12 13 14 15 16 17 18 19 20 21 22 23 24 25 26 27 28 class MainActivity : AppCompatActivity override fun onCreate (savedInstanceState: Bundle ?) val intent = Intent(this , MyService::class .java )
flowchart TB
调用了n次startService -->|停止服务| 1次stopService
既调用了startService又调用了bindService -->|停止服务| stopService+unbindService
A(同一个Service类只会存在一个实例)
前台Service和普通Service最大的区别就在于,它会一直有一个正在运行的图标在系统的状态栏显示,下拉状态栏后可以看到更加详细的信息,非常类似于通知的效果。
由于状态栏中一直有一个正在运行的图标,相当于我们的应用以另外一种形式保持在前台可见状态,所以系统不会倾向于回收前台Service。
启用方式:在<Service>.onCreat()中创建一条通知,大体上与1.1中创建通知的方式一样,不同的是不用通知管理器发送通知而是以startForeground(…)发送通知。
应用开启前台服务权限 1 2 3 4 5 <manifest xmlns:android ="http://schemas.android.com/apk/res/android" package ="com.example.servicetest" > <uses-permission android:name ="android.permission.FOREGROUND_SERVICE" /> </manifest >
前台服务实例 1 2 3 4 5 6 7 8 9 10 11 12 13 14 15 16 17 18 19 20 21 22 class MyService : Service override fun onCreate () super .onCreate()val manager = getSystemService(Context.NOTIFICATION_SERVICE) asNotificationManagerif (Build.VERSION.SDK_INT >= Build.VERSION_CODES.O) {val channel = NotificationChannel("my_service" , "前台Service通知" , NotificationManager.IMPORTANCE_DEFAULT)val intent = Intent(this , MainActivity::class .java )val pi = PendingIntent.getActivity(this , 0 , intent, 0 )val notification = NotificationCompat.Builder(this , "my_service" )"This is content title" )"This is content text" )1 , notification)
classDiagram
class IntentService {
<<Abstract>>
onHandleIntent(Intent intent)*
}
class MyIntentService {
<<自定义>>
}
class Service {
<<Abstract>>
}
Service <|-- IntentService
IntentService <|-- MyIntentService


